Acne scars can stick around long after breakouts clear up, leaving you frustrated with uneven skin texture and discoloration. If you’re dealing with these stubborn marks and want to improve your skin without expensive dermatology visits, you’re in the right place.
This guide is for anyone looking to treat acne scars at home using proven methods that actually work. You’ll discover the different types of scars you’re dealing with and learn which approach works best for each one.
We’ll also dive into powerful skincare ingredients like vitamin C and retinoids that can fade scars over time, plus simple treatment techniques you can do in your own bathroom.
By the end, you’ll have a clear roadmap for building an effective daily routine and making lifestyle changes that help your skin heal faster.
Understanding Different Types of Acne Scars
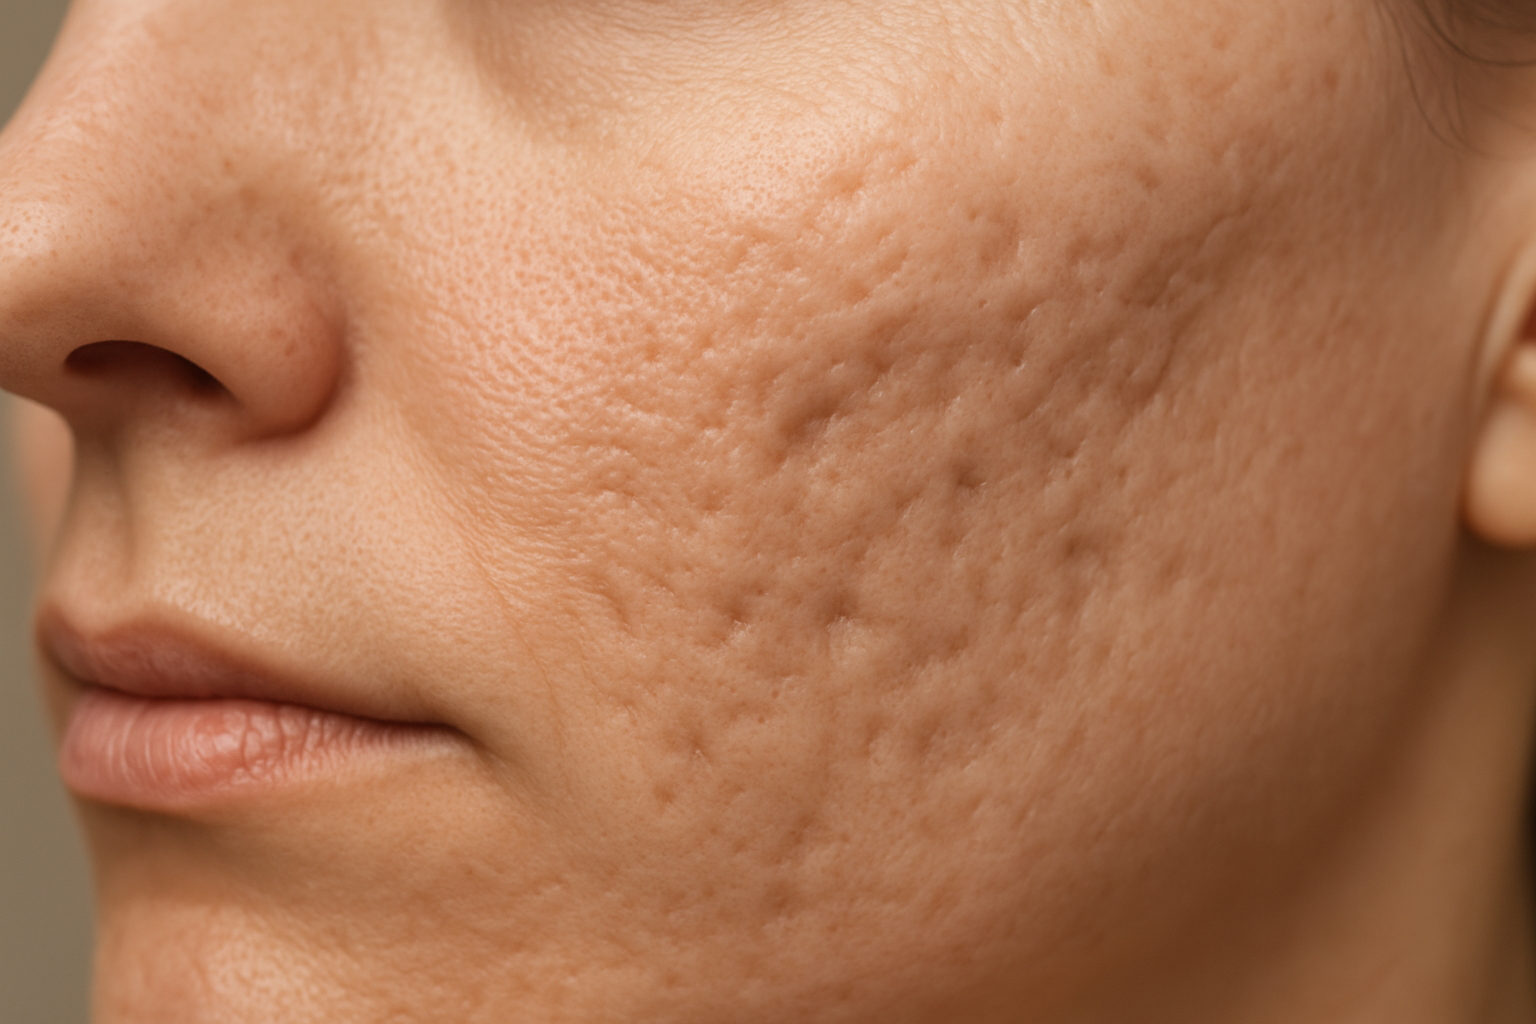
Identifying Ice Pick Scars and Their Characteristics
Ice pick scars are the most common type of acne scarring, making up about 60-70% of all acne scars. These scars get their name from their appearance – they look like someone took a tiny ice pick and poked deep, narrow holes into your skin.
The scars are typically less than 2mm wide but can extend deep into the dermis, creating a sharp, V-shaped depression.
You’ll recognize ice pick scars by their:
-
Small, round openings at the surface
-
Deep vertical channels that narrow as they go deeper
-
Sharp, defined edges
-
Appearance of enlarged pores or tiny holes
-
Most common locations on the cheeks and forehead
These scars form when inflammatory acne damages the skin deeply, causing tissue loss. The healing process creates these characteristic narrow, deep channels that can be particularly challenging to treat at home because of their depth.
Recognizing Boxcar Scars and Treatment Approaches
Boxcar scars have a completely different appearance from ice pick scars. They’re wider depressions with clearly defined, sharp vertical edges – think of them as small craters with steep walls.
These scars are typically 1.5-4mm wide and have a flat bottom, giving them a rectangular or “boxcar” shape when viewed in profile.
Key features of boxcar scars include:
-
Wide, angular depressions
-
Well-defined edges
-
Flat or slightly sloped bottoms
-
Varying depths from shallow to deep
-
Often appear on the lower cheeks and jaw
| Scar Type | Width | Depth | Edge Definition | Bottom Shape |
|---|---|---|---|---|
| Ice Pick | <2mm | Very Deep | Sharp | Narrow |
| Boxcar | 1.5-4mm | Variable | Sharp | Flat |
| Rolling | >4mm | Shallow | Sloped | Undulating |
The structured nature of boxcar scars makes them more responsive to certain home treatments compared to ice pick scars. Their wider surface area allows topical treatments to penetrate more effectively.
Understanding Rolling Scars and Their Appearance
Rolling scars create an uneven, wave-like texture across your skin’s surface. Unlike the sharp, defined edges of ice pick and boxcar scars, rolling scars have gentle slopes and curved edges that create a rolling hills effect. They’re typically wider than 4-5mm and give your skin an undulating, bumpy appearance.
Rolling scars develop when:
-
Fibrous bands form beneath the skin surface
-
These bands pull down sections of skin
-
The surrounding tissue creates gentle slopes rather than sharp edges
-
Collagen production becomes irregular during healing
The characteristics that help you identify rolling scars:
-
Broad depressions with sloping edges
-
Soft transitions between normal skin and scarred areas
-
Wave-like or undulating skin texture
-
Most noticeable under certain lighting conditions
-
Can make skin appear prematurely aged
Distinguishing Between Atrophic and Hypertrophic Scars
Understanding the difference between atrophic and hypertrophic scars is crucial for choosing the right treatment approach. This classification system looks at whether the scar sits below, at, or above your normal skin level.
Atrophic Scars are the most common type of acne scarring. They form when there’s a loss of tissue during the healing process, creating depressions in the skin. All three types mentioned above – ice pick, boxcar, and rolling scars – are examples of atrophic scars. They appear as:
-
Depressions below normal skin level
-
Areas where tissue has been lost
-
Indentations of various shapes and sizes
Hypertrophic Scars are the opposite – they form when your skin produces too much collagen during healing, creating raised areas above the normal skin surface. These scars:
-
Appear as raised bumps or ridges
-
Feel firm or rubbery to touch
-
May be red or darker than surrounding skin
-
Are less common than atrophic scars
-
More frequently occur on the chest, back, and shoulders
The treatment approach for these two types differs significantly. Atrophic scars need treatments that stimulate collagen production to fill in the depressions, while hypertrophic scars require methods to break down excess collagen and flatten the raised tissue.
Essential Home Remedies for Acne Scar Reduction

Using natural exfoliants like oatmeal and sugar scrubs
Oatmeal stands out as one of the gentlest yet most effective natural exfoliants for acne-scarred skin. Ground oats contain saponins, natural compounds that cleanse without stripping your skin’s protective barrier.
Create a simple oatmeal scrub by blending half a cup of plain oats until you achieve a fine powder, then mix with enough water to form a paste. The texture helps remove dead skin cells that can make scars appear more prominent.
Sugar scrubs offer slightly more intensive exfoliation and work particularly well for raised acne scars. Brown sugar contains glycolic acid naturally, which helps break down the bonds between dead skin cells.
Mix two tablespoons of brown sugar with one tablespoon of olive oil or coconut oil for added moisture. The key is gentle circular motions – aggressive scrubbing can actually worsen scarring and cause inflammation.
Apply these scrubs no more than twice weekly to avoid over-exfoliation. Your skin should feel smooth, not raw or irritated afterward. Always follow up with a moisturizer to maintain your skin’s hydration levels.
For More Information Contact Us : 73386 71338
Applying honey masks for healing and moisturizing
Raw honey brings impressive healing properties to acne scar treatment through its natural antibacterial and anti-inflammatory compounds. Manuka honey, specifically, contains higher concentrations of methylglyoxal, making it particularly effective for skin repair.
The enzymes in raw honey also promote gentle exfoliation while drawing moisture to the skin.
For a basic honey mask, apply a thin layer of raw honey directly to clean skin and leave for 15-20 minutes before rinsing with warm water.
For enhanced benefits, mix honey with other healing ingredients: combine two tablespoons of honey with one teaspoon of cinnamon powder for added antimicrobial effects, or blend with a few drops of tea tree oil for extra acne-fighting power.
Honey’s humectant properties mean it pulls moisture from the environment into your skin, helping to plump areas around scars and make them less noticeable. Regular use can improve skin texture and reduce the appearance of hyperpigmentation left behind by acne.
Leveraging lemon juice for natural skin lightening
Lemon juice contains natural citric acid and vitamin C, both powerful ingredients for fading dark spots and hyperpigmentation associated with acne scars.
The citric acid works as a natural chemical exfoliant, helping to remove the top layer of damaged skin cells and reveal fresher skin underneath.
Always dilute fresh lemon juice before applying it to your skin – pure lemon juice can be too harsh and may cause irritation or increased sensitivity to sunlight.
Mix equal parts lemon juice and water, or combine with honey for a gentler approach. Apply this mixture to affected areas using a cotton pad, leave for 10-15 minutes, then rinse thoroughly.
Timing matters with lemon treatments. Apply them only in the evening, as citrus can make your skin photosensitive, increasing your risk of sun damage.
Never use lemon juice treatments during the day without proper sun protection. Start with applications just twice a week to gauge your skin’s tolerance.
For More Information Contact Us : 73386 71338
Creating DIY vitamin E oil treatments
Vitamin E oil supports skin repair by neutralizing free radicals that can interfere with the healing process. This antioxidant also helps maintain skin elasticity and can reduce the appearance of both old and new scars over time.
Pure vitamin E oil is quite thick, so many people prefer to mix it with lighter carrier oils.
Create an effective vitamin E treatment by piercing two to three vitamin E capsules and mixing the oil with an equal amount of rosehip seed oil or jojoba oil.
Rosehip oil contains natural retinoids that complement vitamin E’s healing properties, while jojoba closely mimics your skin’s natural sebum.
Apply this oil blend to clean skin before bed, focusing on scarred areas. The overnight treatment gives your skin time to absorb the nutrients without interference from makeup or environmental pollutants.
Consistency is crucial – you’ll typically see improvements after 6-8 weeks of regular use. Store any leftover oil mixture in the refrigerator to prevent oxidation and maintain potency.
Proven Skincare Ingredients for Scar Treatment
Incorporating retinol products into your routine
Retinol stands as one of the most powerful ingredients for acne scar treatment, working by accelerating cell turnover and stimulating collagen production.
This vitamin A derivative helps smooth textured skin by encouraging the shedding of damaged surface cells while promoting the growth of healthy new tissue underneath.
Start with a low concentration retinol product (0.25% to 0.5%) to avoid irritation, applying it only at night since retinol increases sun sensitivity.
Begin by using it twice a week, gradually increasing frequency as your skin builds tolerance. Always apply retinol to clean, dry skin and follow with a moisturizer to prevent excessive dryness.
The key to success with retinol lies in patience and consistency. Results typically become visible after 8-12 weeks of regular use, with continued improvement over several months.
Common side effects during the initial weeks include mild redness, peeling, and increased sensitivity, which usually subside as your skin adapts.
Using vitamin C serums for collagen production
Vitamin C serums offer exceptional benefits for acne scar treatment by boosting collagen synthesis and protecting against environmental damage. L-ascorbic acid, the most potent form of vitamin C, penetrates deep into the skin to repair damaged tissue and fade discoloration.
Apply vitamin C serum in the morning after cleansing but before moisturizer and sunscreen. Look for serums containing 10-20% vitamin C concentration for optimal results without excessive irritation.
Stable forms like magnesium ascorbyl phosphate or sodium ascorbyl phosphate work well for sensitive skin types.Vitamin C also provides powerful antioxidant protection, preventing further damage from free radicals that can worsen scarring.
Regular use helps brighten overall complexion while specifically targeting hyperpigmentation left behind by previous breakouts. Store vitamin C products in a cool, dark place to maintain their effectiveness.
For More Information Contact Us : 73386 71338
Applying niacinamide for skin texture improvement
Niacinamide, also known as vitamin B3, excels at improving skin texture and reducing the appearance of enlarged pores often associated with acne scarring.
This gentle yet effective ingredient regulates oil production, strengthens the skin barrier, and promotes cellular renewal without causing irritation.
Use niacinamide serums or treatments containing 5-10% concentration twice daily for best results. Unlike retinol, niacinamide can be safely combined with other active ingredients and used both morning and evening.
It pairs particularly well with hyaluronic acid and vitamin C, making it easy to incorporate into existing routines.
Regular niacinamide use helps minimize the depth of shallow acne scars by improving overall skin smoothness and reducing inflammation. It also helps control excess sebum production, preventing future breakouts that could lead to additional scarring.
Benefits of alpha hydroxy acids for gentle exfoliation
Alpha hydroxy acids (AHAs) like glycolic acid and lactic acid provide controlled exfoliation that removes dead skin cells and encourages new cell growth.
This process gradually diminishes the appearance of surface-level acne scars while improving overall skin brightness and smoothness.
Glycolic acid, with its small molecular size, penetrates deeply to address more stubborn scarring, while lactic acid offers gentler exfoliation suitable for sensitive skin.
Start with lower concentrations (5-10%) and use AHA products 2-3 times per week, always following with broad-spectrum sunscreen during the day.
Regular AHA use helps reveal fresher, more even-toned skin beneath damaged surface layers. The exfoliation process also enhances the absorption of other treatment products, making your entire skincare routine more effective for scar reduction.
Effective At-Home Treatment Techniques
Performing Facial Massages to Improve Circulation
Facial massage serves as a gentle yet powerful technique for encouraging blood flow to scarred areas, which helps deliver essential nutrients and oxygen to damaged tissue.
When you massage your face regularly, you’re essentially kickstarting the natural healing process that helps break down scar tissue over time.
Start with clean hands and apply a few drops of facial oil or your favorite moisturizer to create smooth gliding motion. Use your fingertips to make small circular motions over scarred areas, applying light to medium pressure. Focus on areas with the most visible scarring for about 2-3 minutes per session.
The upward and outward massage strokes work best for promoting lymphatic drainage while stimulating collagen production. Pay special attention to the jawline, cheeks, and forehead where acne scars commonly appear. Performing this ritual twice daily, morning and evening, creates the consistency needed for visible improvements.
Many people see subtle changes in skin texture and scar appearance after 4-6 weeks of regular massage. The increased circulation also gives your skin a natural glow while gradually softening the appearance of raised or depressed scars.
Using Ice Therapy to Reduce Inflammation
Ice therapy offers immediate relief for inflamed acne scars while helping to minimize their appearance through controlled cold exposure. This simple technique reduces swelling around scarred tissue and temporarily tightens the skin, making scars less noticeable.
Wrap ice cubes in a clean cloth or use a cold compress for safety. Never apply ice directly to your skin, as this can cause frostbite or additional damage. Hold the wrapped ice against scarred areas for 30-60 seconds at a time, then remove for equal intervals to prevent skin damage.
The cold temperature constricts blood vessels, reducing inflammation and temporarily numbing the area. This process helps calm overactive scar tissue and can provide relief from any lingering sensitivity around old acne spots.
Practice ice therapy 2-3 times per week, preferably in the evening when you won’t be exposing treated areas to sun immediately afterward. Some people find alternating between ice therapy and warm compresses creates an even more effective circulation boost.
For More Information Contact Us : 73386 71338
Applying Silicone Gel Sheets for Scar Flattening
Silicone gel sheets represent one of the most clinically proven at-home treatments for flattening raised acne scars. These transparent, adhesive sheets work by creating a protective barrier that maintains optimal moisture levels while applying gentle pressure to scar tissue.
Clean the scarred area thoroughly before application, ensuring the skin is completely dry. Cut the silicone sheet to fit the scar size, leaving a small border around the edges. Press firmly to ensure proper adhesion, smoothing out any air bubbles that might form underneath.
Wear the sheets for 12-24 hours daily, removing them only for cleaning or skin care routines. Most silicone sheets can be reused multiple times when properly cleaned with mild soap and water. Replace sheets when they lose their adhesive properties, typically after 2-3 weeks of regular use.
Results typically become visible after 6-8 weeks of consistent use. Raised scars gradually flatten while becoming softer and less noticeable.
The silicone creates an environment that encourages healthy collagen remodeling, helping transform thick, irregular scar tissue into smoother skin that better matches surrounding areas.
Building a Consistent Daily Skincare Routine
Morning routine essentials for scar-prone skin
Your morning skincare routine sets the foundation for healthy skin recovery throughout the day. Start with a gentle, non-comedogenic cleanser that removes overnight buildup without stripping your skin’s natural barrier.
Look for cleansers containing salicylic acid or glycolic acid in low concentrations to provide mild exfoliation while preventing new breakouts.
After cleansing, apply a vitamin C serum to boost collagen production and brighten existing scars. Choose a stable form like magnesium ascorbyl phosphate if you have sensitive skin, or L-ascorbic acid for maximum potency.
Follow with a lightweight, fragrance-free moisturizer containing hyaluronic acid or ceramides to maintain skin hydration without clogging pores.
The most critical step is broad-spectrum SPF 30 or higher. UV exposure darkens acne scars and slows healing, making sun protection non-negotiable. Apply generously and reapply every two hours when outdoors. Consider tinted sunscreens for additional coverage of existing scars.
Keep your morning routine simple with 3-4 products maximum. Rushing through multiple steps or using harsh products can irritate healing skin and worsen scarring. Consistency matters more than complexity – stick to this routine daily for at least 8-12 weeks to see meaningful improvements.
Evening treatment protocols for maximum healing
Nighttime offers the perfect opportunity for intensive scar treatment since your skin repairs itself while you sleep. Start your evening routine 30-60 minutes before bed to allow proper absorption of active ingredients.
Begin with the same gentle cleanser from your morning routine, followed by a targeted treatment containing retinoids. Start with over-the-counter retinol 2-3 times per week, gradually increasing frequency as your skin builds tolerance. Retinoids accelerate cell turnover, helping fade post-inflammatory hyperpigmentation and smooth textural irregularities.
On non-retinoid nights, alternate with alpha hydroxy acids like glycolic acid or lactic acid. These chemical exfoliants remove dead skin cells and promote new cell growth.
Begin with 5-10% concentrations once weekly, slowly increasing to every other night if your skin tolerates it well.
Apply a nourishing night moisturizer containing ingredients like niacinamide, peptides, or growth factors to support overnight repair. Consider using a humidifier in your bedroom to prevent moisture loss during sleep.
For More Information Contact Us : 73386 71338
| Treatment Schedule | Week 1-2 | Week 3-4 | Week 5+ |
|---|---|---|---|
| Retinoid nights | 2x/week | 3x/week | 4-5x/week |
| AHA nights | 1x/week | 2x/week | 2-3x/week |
| Rest nights | 4x/week | 2x/week | 0-1x/week |
Weekly intensive treatment schedules
Supplement your daily routine with weekly intensive treatments to accelerate scar healing. These concentrated sessions provide deeper penetration of active ingredients and enhanced results.
Clay mask treatments once or twice weekly help control oil production and prevent new breakouts. Choose masks containing sulfur, bentonite clay, or kaolin clay. Apply for 10-15 minutes, focusing on areas prone to breakouts while avoiding over-dried scar tissue.
At-home chemical peels using higher concentrations of AHAs or BHAs can dramatically improve scar appearance. Start with 20-30% glycolic acid peels once every two weeks, following package instructions carefully. Always perform a patch test first and never exceed recommended contact times.
Hydrating sheet masks containing ingredients like snail mucin, centella asiatica, or hyaluronic acid help soothe irritation from active treatments. Use these 1-2 times per week, especially after chemical peels or increased retinoid use.
Create a rotating schedule:
-
Week 1: Clay mask Monday, hydrating mask Thursday
-
Week 2: Chemical peel Sunday, hydrating mask Wednesday
-
Week 3: Clay mask Tuesday, hydrating mask Friday
-
Week 4: Chemical peel Saturday, hydrating mask Thursday
Protecting skin with proper sun protection
Sun protection goes beyond applying sunscreen – it’s about creating a comprehensive shield against UV damage that can permanently darken acne scars and slow healing.
Choose broad-spectrum sunscreens with zinc oxide or titanium dioxide for sensitive, healing skin. These mineral filters provide immediate protection without causing irritation common with chemical sunscreens.
Apply 1/4 teaspoon for your face and neck, ensuring even coverage including often-missed areas like earlobes and hairline.
Reapplication is crucial for continued protection. Set phone reminders every two hours, or immediately after sweating or swimming. Keep a powder sunscreen in your bag for easy touch-ups over makeup.
Physical protection amplifies your sunscreen’s effectiveness. Wide-brimmed hats provide additional facial coverage, while UV-protective clothing shields your body. Seek shade during peak UV hours (10 AM to 4 PM) and consider UV-blocking window films for your car and home.
Indoor protection matters too. Blue light from screens and fluorescent lighting can worsen post-inflammatory hyperpigmentation. Some tinted sunscreens offer blue light protection, or you can use a separate blue light blocking serum under your regular SPF.
Monitor the UV index daily through weather apps and adjust your protection accordingly. On high UV days (index 6+), double up with both chemical and physical protection methods for maximum scar preservation.
Lifestyle Changes That Accelerate Healing

Maintaining a Diet Rich in Skin-Healing Nutrients
Your plate holds powerful allies in the fight against acne scars. Vitamin C acts as your skin’s construction worker, building collagen that fills in those stubborn indentations. Load up on citrus fruits, bell peppers, strawberries, and broccoli to give your body the raw materials it needs for repair.
Zinc plays a crucial role in wound healing and reducing inflammation. You’ll find this mineral in oysters, pumpkin seeds, chickpeas, and lean meats. Omega-3 fatty acids from salmon, walnuts, and flaxseeds calm inflammation while promoting healthy cell turnover.
Don’t overlook vitamin A – it speeds up skin renewal and helps prevent new breakouts. Sweet potatoes, carrots, and leafy greens deliver this powerhouse nutrient naturally. Beta-carotene converts to vitamin A in your body, creating a steady supply for ongoing repair.
Antioxidant-rich foods protect your healing skin from free radical damage. Blueberries, green tea, and dark chocolate (yes, really!) shield your skin while repair processes unfold. Avoid processed foods, excessive sugar, and dairy if you notice they trigger breakouts – these can sabotage your healing progress.
Staying Hydrated for Optimal Skin Regeneration
Water isn’t just refreshing – it’s essential for cellular repair. Proper hydration helps your skin cells function at peak performance, speeding up the natural healing process that fades acne scars over time.
Aim for at least 8 glasses daily, but increase this if you’re active or live in a dry climate. Your skin will thank you with improved elasticity and faster turnover of damaged cells.
Green tea counts toward your fluid intake while delivering additional benefits. Its anti-inflammatory compounds reduce redness and support healing. Herbal teas like chamomile and rooibos provide hydration without caffeine, perfect for evening consumption.
Monitor your urine color – pale yellow indicates good hydration. Dark yellow suggests you need more fluids. Adding slices of cucumber, lemon, or mint to your water makes hydration more enjoyable and adds trace nutrients.
Managing Stress to Prevent Further Breakouts
Stress hormones like cortisol trigger oil production, creating perfect conditions for new acne formation. This creates a frustrating cycle where stress causes breakouts, and breakouts cause more stress.
Regular exercise serves as a natural stress reliever while improving circulation to your skin. Even 20 minutes of walking daily helps regulate stress hormones and delivers oxygen-rich blood to healing tissues.
Meditation and deep breathing exercises activate your body’s relaxation response. Apps like Headspace or simple breathing techniques can fit into any schedule. Just five minutes of focused breathing can lower cortisol levels significantly.
Creative outlets provide emotional release without triggering stress responses. Whether it’s journaling, painting, or playing music, engaging in activities you enjoy naturally reduces stress hormones.
For More Information Contact Us : 73386 71338
Getting Adequate Sleep for Natural Skin Repair
Your skin does its heaviest repair work while you sleep. During deep sleep phases, growth hormone production peaks, accelerating tissue repair and collagen synthesis that fills in acne scars.
Aim for 7-9 hours nightly, going to bed and waking up at consistent times. This regularity supports your circadian rhythm, optimizing natural repair processes.
Create a sleep-friendly environment by keeping your bedroom cool, dark, and quiet. Change pillowcases frequently to prevent bacterial buildup that could cause new breakouts during your healing journey.
Avoid screens for at least an hour before bed – blue light disrupts melatonin production, which coordinates nighttime repair activities. Reading or gentle stretching prepares your body for restorative sleep instead
Tracking Progress and Adjusting Treatments
Taking Before and After Photos for Comparison
Documenting your acne scar treatment journey with photos creates a powerful visual record of your progress. Start by taking clear, well-lit photos from multiple angles using natural daylight near a window.
Keep your lighting conditions, camera distance, and facial positioning consistent for each photo session. Take pictures of your entire face and close-up shots of specific problem areas.
Schedule photo sessions every two weeks at the same time of day, preferably in the morning when your skin looks most natural.
Create a simple system by labeling photos with dates and treatment details. Store them in a dedicated folder on your phone or computer for easy comparison.
Don’t expect dramatic changes in the first few weeks. Acne scar improvement happens gradually, and sometimes the changes are so subtle that you won’t notice them without side-by-side comparisons.
Having these visual records helps you stay motivated during slower progress periods and shows you which treatments work best for your specific scar types.
Monitoring Skin Sensitivity and Reactions
Your skin will tell you everything you need to know about how well your treatments are working. Pay attention to daily changes in texture, color, and sensitivity levels.
Normal treatment responses include mild redness, slight flaking, or temporary dryness that subsides within a few hours.
Watch for warning signs that indicate you need to scale back your routine:
-
Persistent burning or stinging sensations
-
Excessive peeling or flaking that doesn’t improve
-
New breakouts in areas where you don’t typically get acne
-
Increased sensitivity to sunlight
-
Swelling or rash-like reactions
Keep a simple skin journal noting how your skin feels each morning and evening. Rate your skin’s comfort level on a scale of 1-10 and note any unusual reactions. This tracking helps you identify patterns and triggers that might not be obvious otherwise.
Knowing When to Modify Your Treatment Approach
Smart treatment adjustments can make the difference between success and frustration. If you’re not seeing any improvement after 6-8 weeks of consistent use, your skin might need a different approach.
Some scars respond better to chemical exfoliation while others improve more with hydrating treatments and gentle massage techniques.
Seasonal changes often require routine modifications. Your skin might handle stronger treatments better in cooler months when you’re spending less time in direct sunlight.
During summer, focus on gentler approaches and prioritize sun protection to prevent further scar darkening.
Life circumstances also influence your treatment strategy. Stressful periods, hormonal changes, or illness can make your skin more reactive than usual. During these times, simplify your routine and focus on basic maintenance rather than aggressive scar treatment.
Consider stepping up your approach if you’ve been using gentle methods for several months without significant progress.
This might mean introducing retinoids, increasing the frequency of chemical exfoliants, or adding new active ingredients to your routine. Always introduce changes gradually and monitor your skin’s response carefully.
Treating acne scars at home doesn’t have to be complicated or expensive. From understanding whether you’re dealing with rolling, boxcar, or ice pick scars to incorporating proven ingredients like vitamin C, retinoids, and alpha hydroxy acids into your routine, you now have the knowledge to tackle these stubborn marks.
The key lies in consistency – sticking to your daily skincare routine, making smart lifestyle choices that support healing, and giving your treatments time to work their magic.
Remember that patience is your best friend when it comes to fading acne scars. Track your progress with photos and be ready to adjust your approach if something isn’t working after a few months.
While home treatments can make a real difference for many people, don’t hesitate to consult a dermatologist if your scars are deep or if you’re not seeing the results you want.
Your skin deserves the best care possible, and sometimes that means knowing when professional help is the right next step.
For More Information Contact Us : 73386 71338